E-Ink Display | ESPHome-TRMNL 7.5"

Files
Printables Thingiverse Creality Cloud MakerWorld github
Critical changes
Critical changes have been made in release 2.0.0. The firmware, blueprint, and integration have been updated.
Description
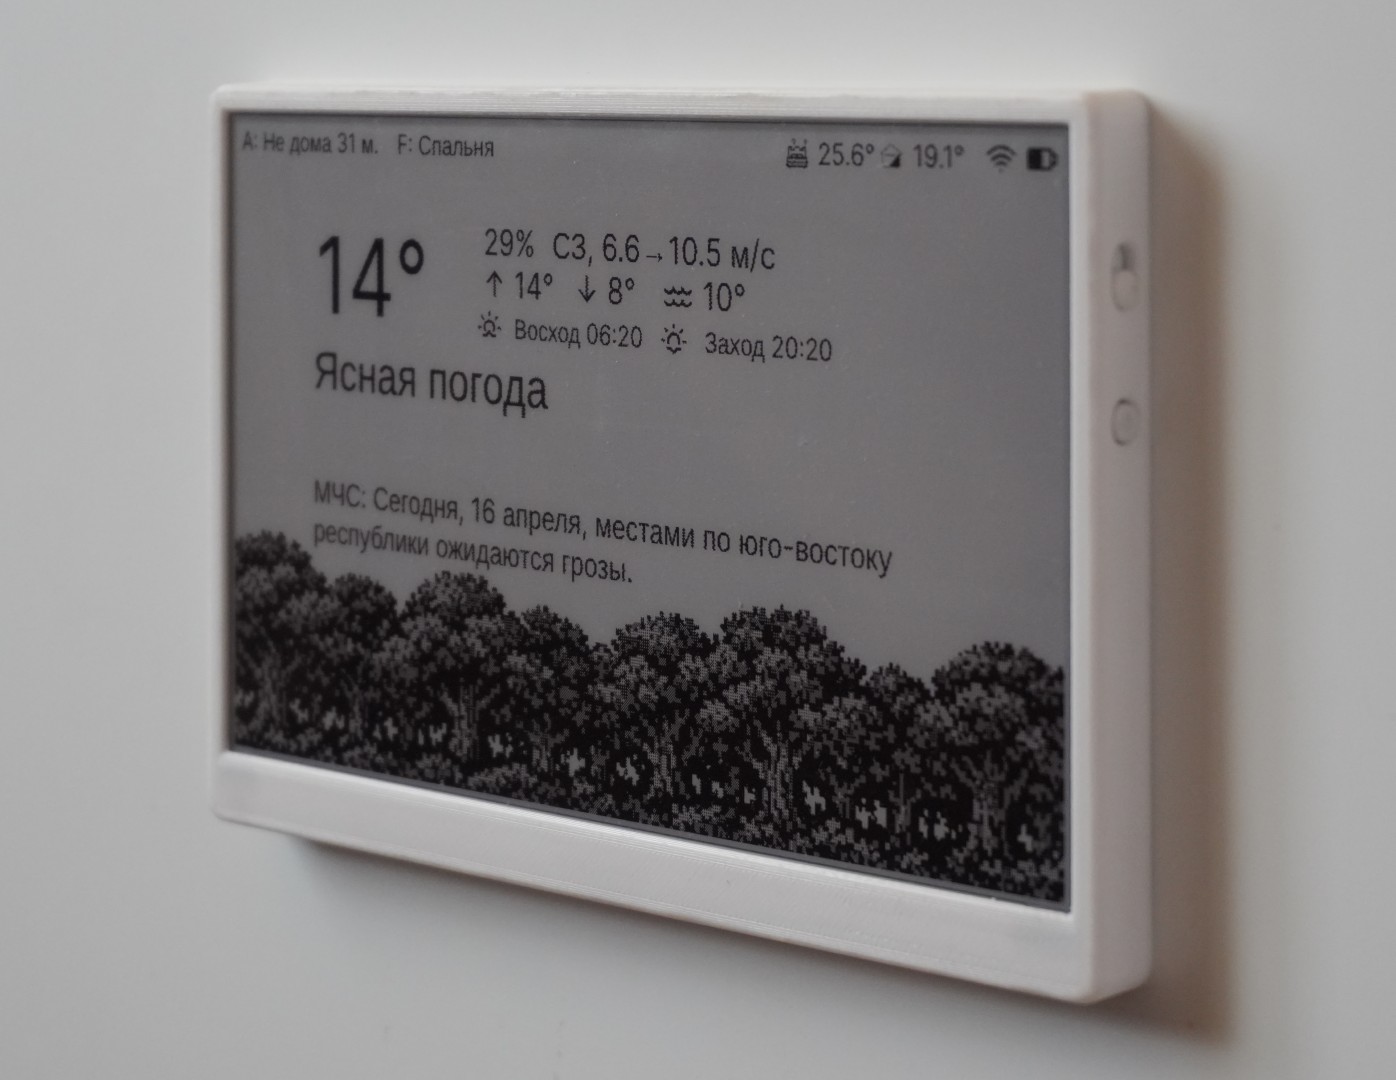
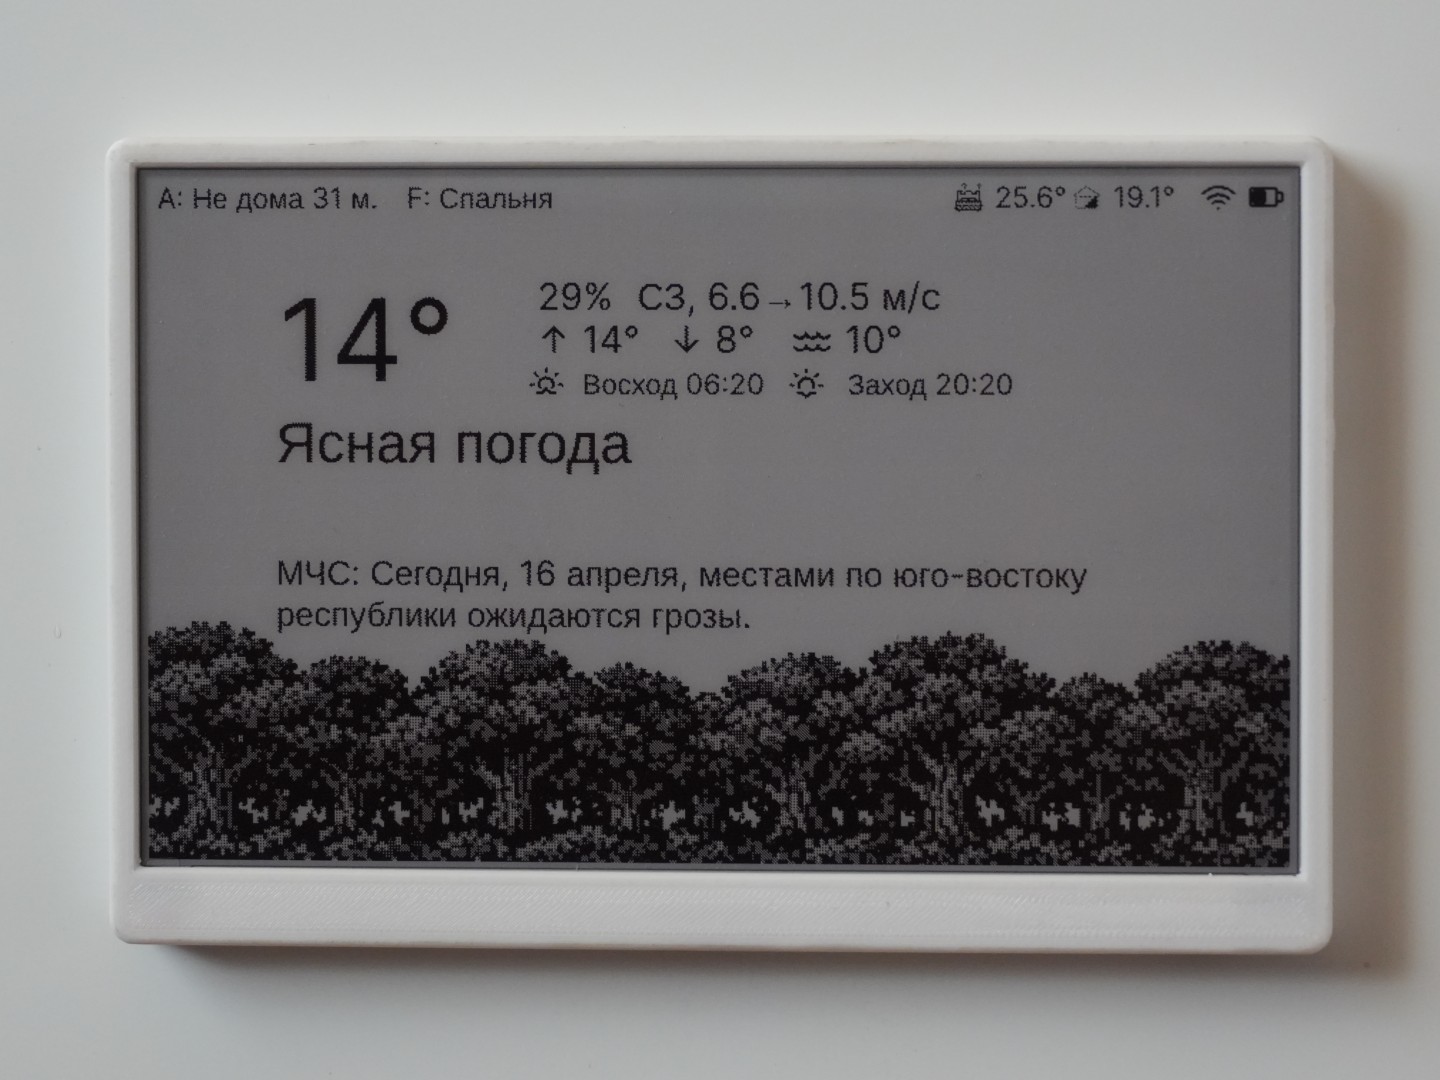
This is an E-Ink display running on ESPHome firmware, designed to display information from your Inker server and managed by Home Assistant. The project was not created by the "ESPHome" or "TRMNL" team and is not affiliated with them.
flowchart LR
    HA["Home <br> Assistant"] -- JSON API --> Inker["Inker"]
    Inker <-- HTTP requests --> ESPH["ESPHome <br> E-Ink Display"]
    Inker -- PNG --> ESPH["ESPHome <br> E-Ink Display"]
    HA <--> Int["Custom Integration"]
    HA --> BP["blueprint"]
    BP --> Int
    Int <-- HTTP requests --> ESPH
Features:
- Built for Smart Home: Display data on the screen and switch pages using "Home Assistant" automations.
- Customizable Refresh Rate: Flexibly change the screen refresh interval directly from "Home Assistant", adapting it to current tasks, scenarios, or the time of day.
- Telemetry: Get real-time display status data in "Home Assistant".
- Energy Efficiency: The screen pauses updates when you are not at home or in the room.
- Extensibility: Thanks to "ESPHome", the device supports connecting a huge number of additional sensors.
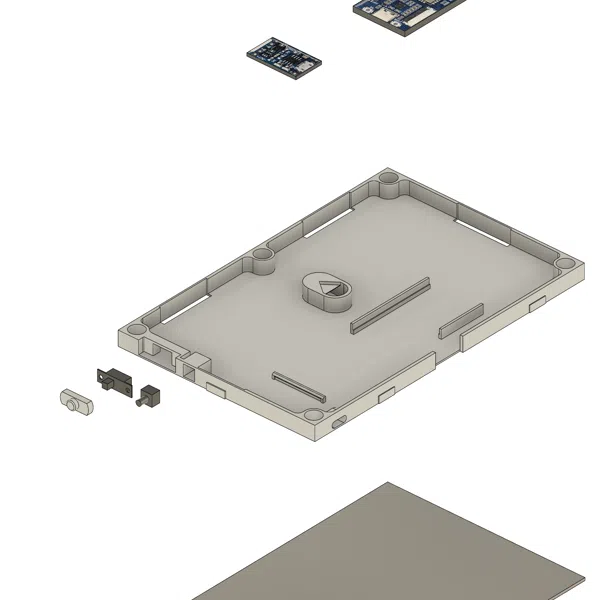
Case:
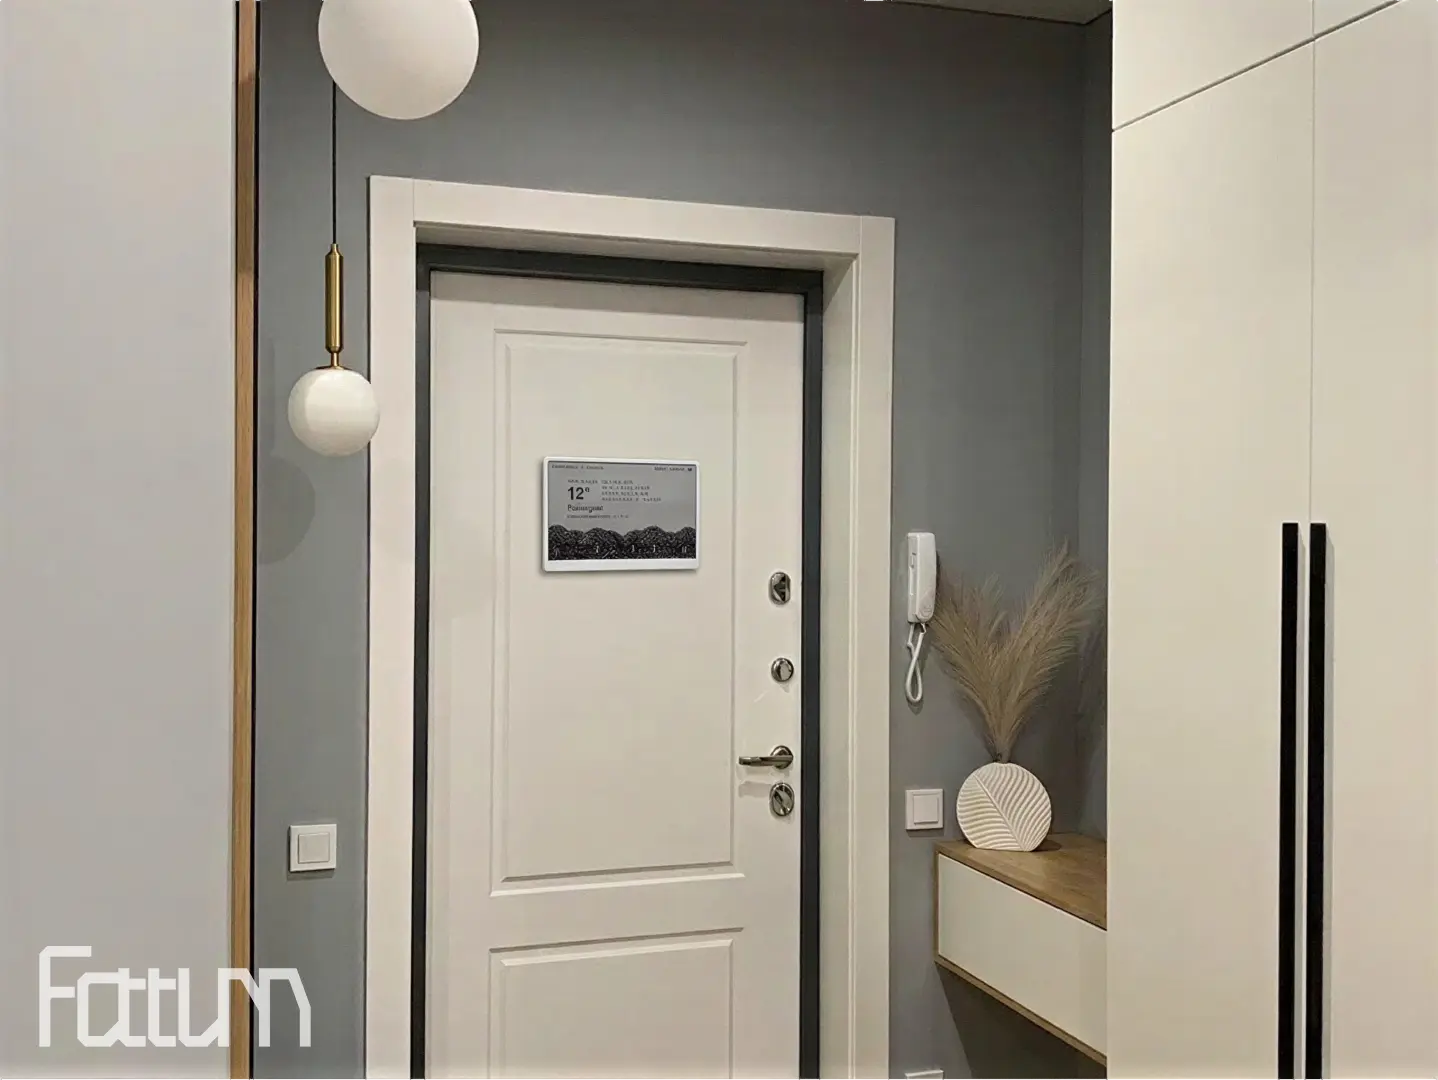
- Compactness: Minimalist case (175.6 x 116.6 x 11.25 mm) with thin bezels, focusing all attention on the screen.
- Ergonomics: Convenient buttons are located in plain sight—no more fumbling for them on the back panel.
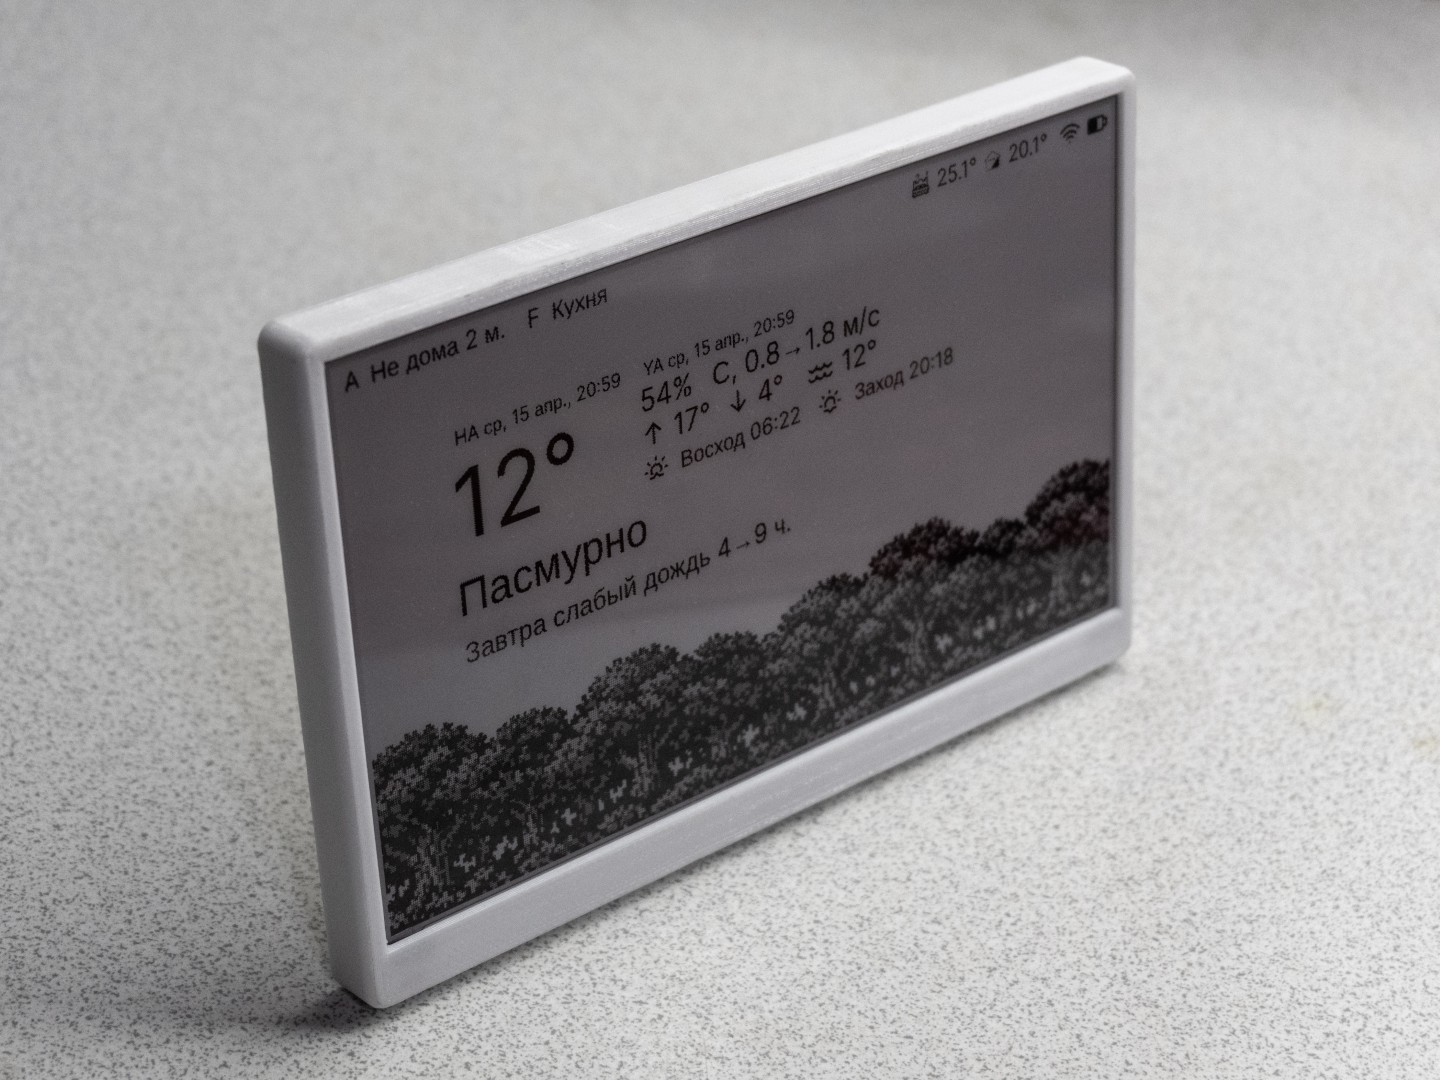
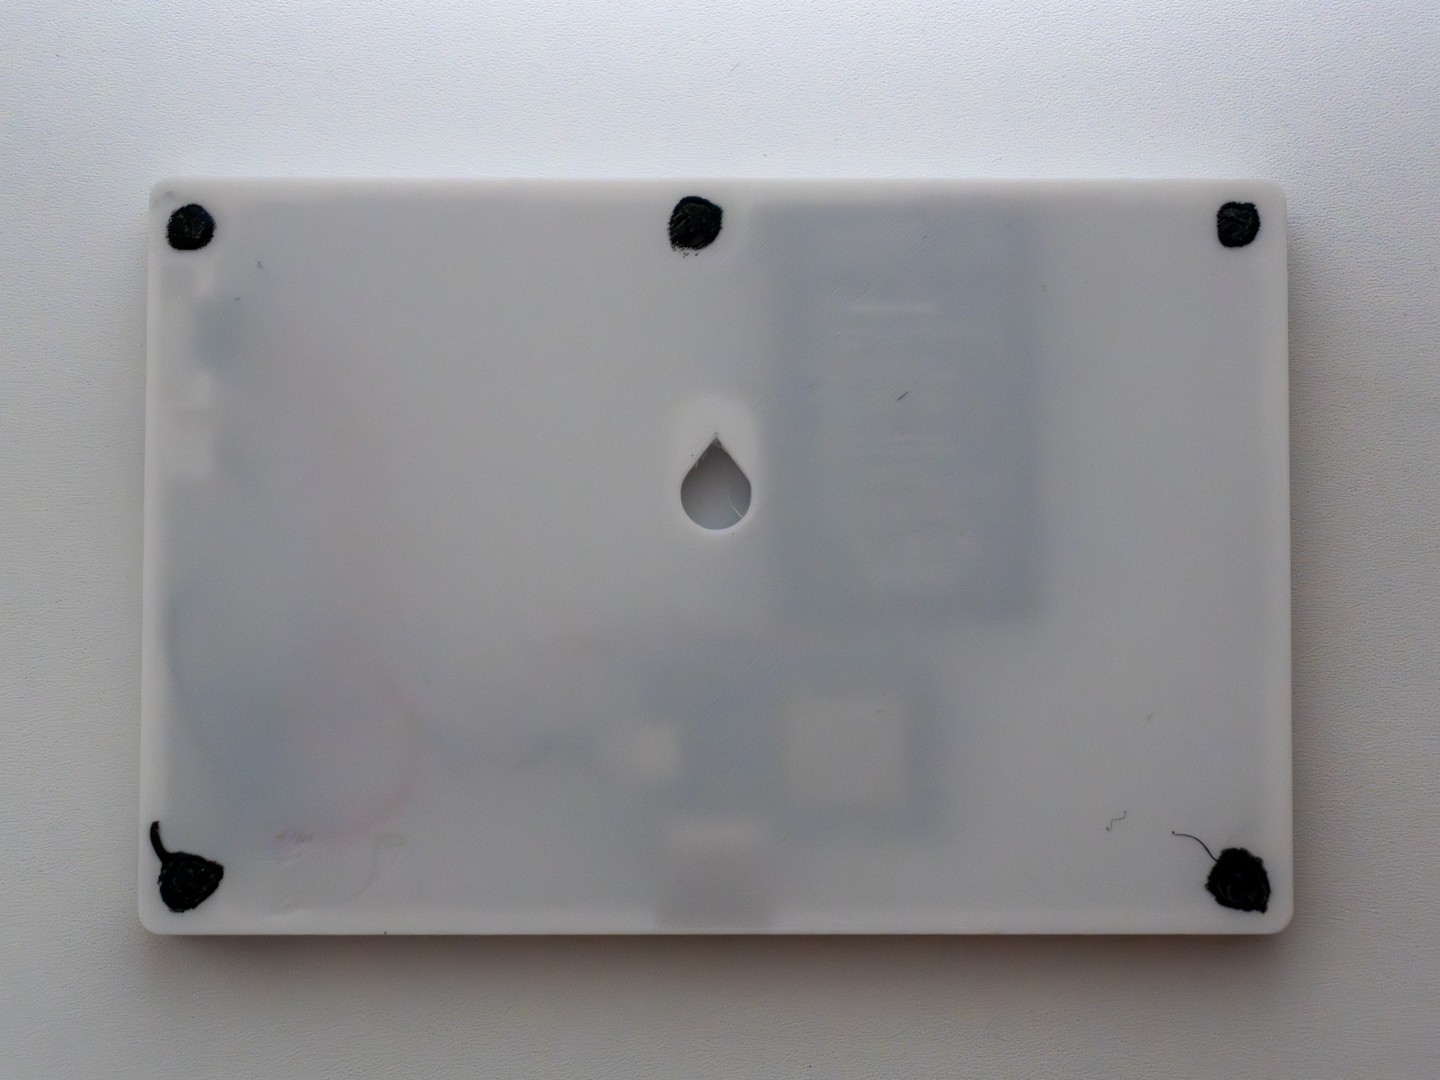
- Three Mounting Options: kickstand (desktop), hanger (wall-mounted), magnets (wall-mounted).
- Simple Assembly: The case is assembled with reliable latches—no extra screws or complex mounting required.
Components
| Image | Component | Link | Qty | Note |
|---|---|---|---|---|
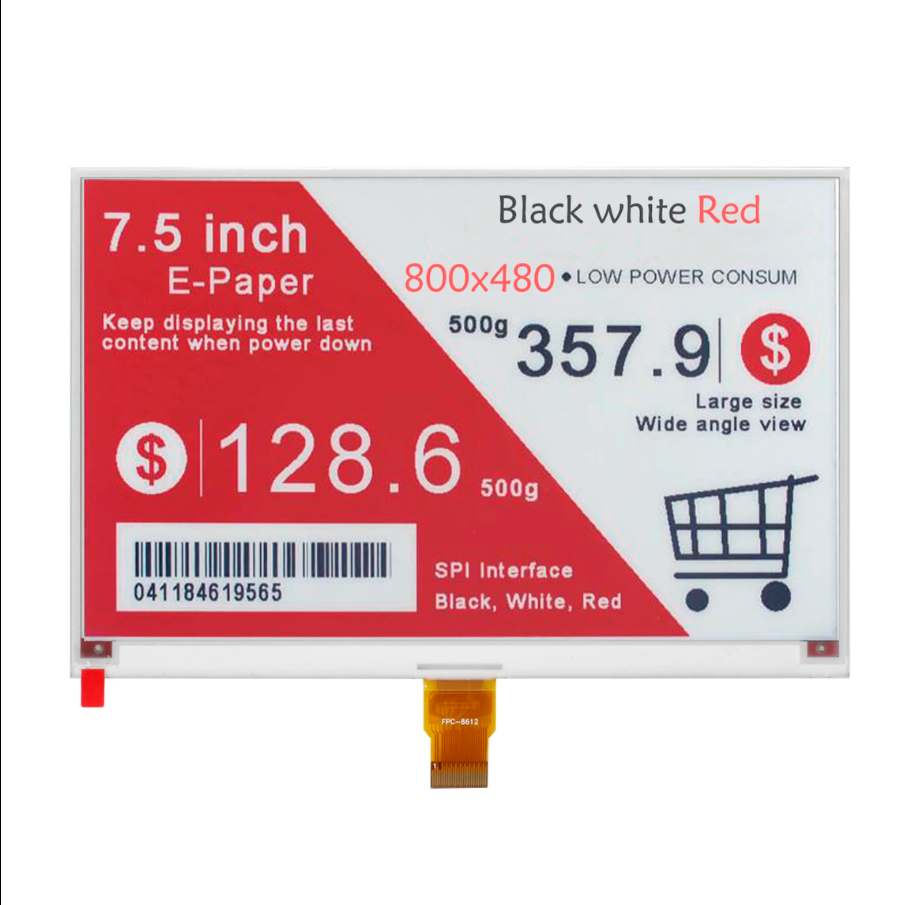 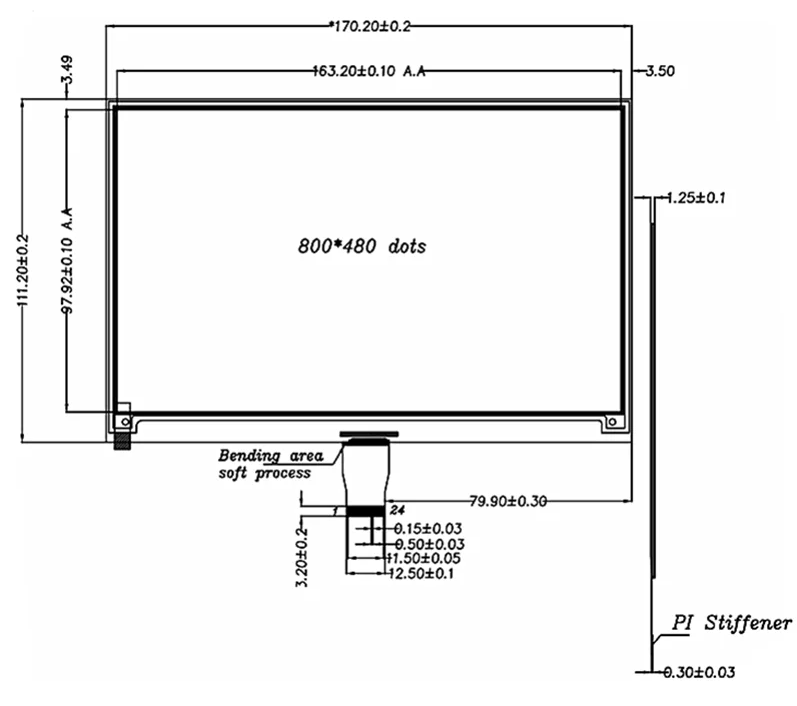 |
7.5" ePaper Display | Aliexpress | 1 | This is a 3-color B/W/R display, but only B/W will work due to RAM limitations. Supported displays Max dimensions: 171.20 x 112.20 x 1.50 mm |
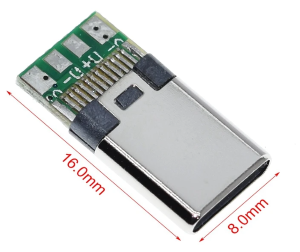 |
USB C plug | Aliexpress | 1 | |
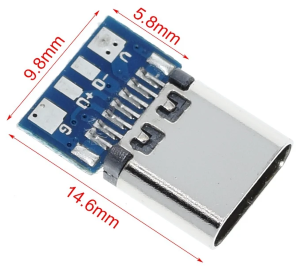 |
USB C socket | Aliexpress | 1 | |
 |
Slide switch TLZWLA SS12F15VG4 | Aliexpress | 1 | |
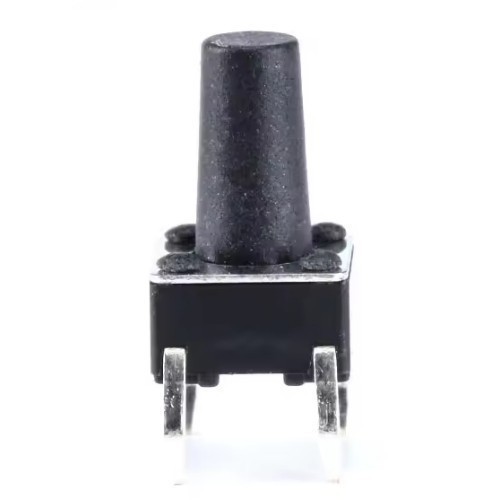 |
Tactile button 6X6X10 | Aliexpress | 1 | |
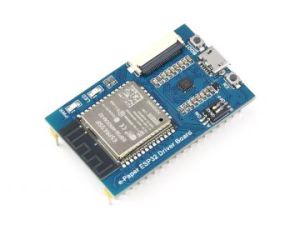 |
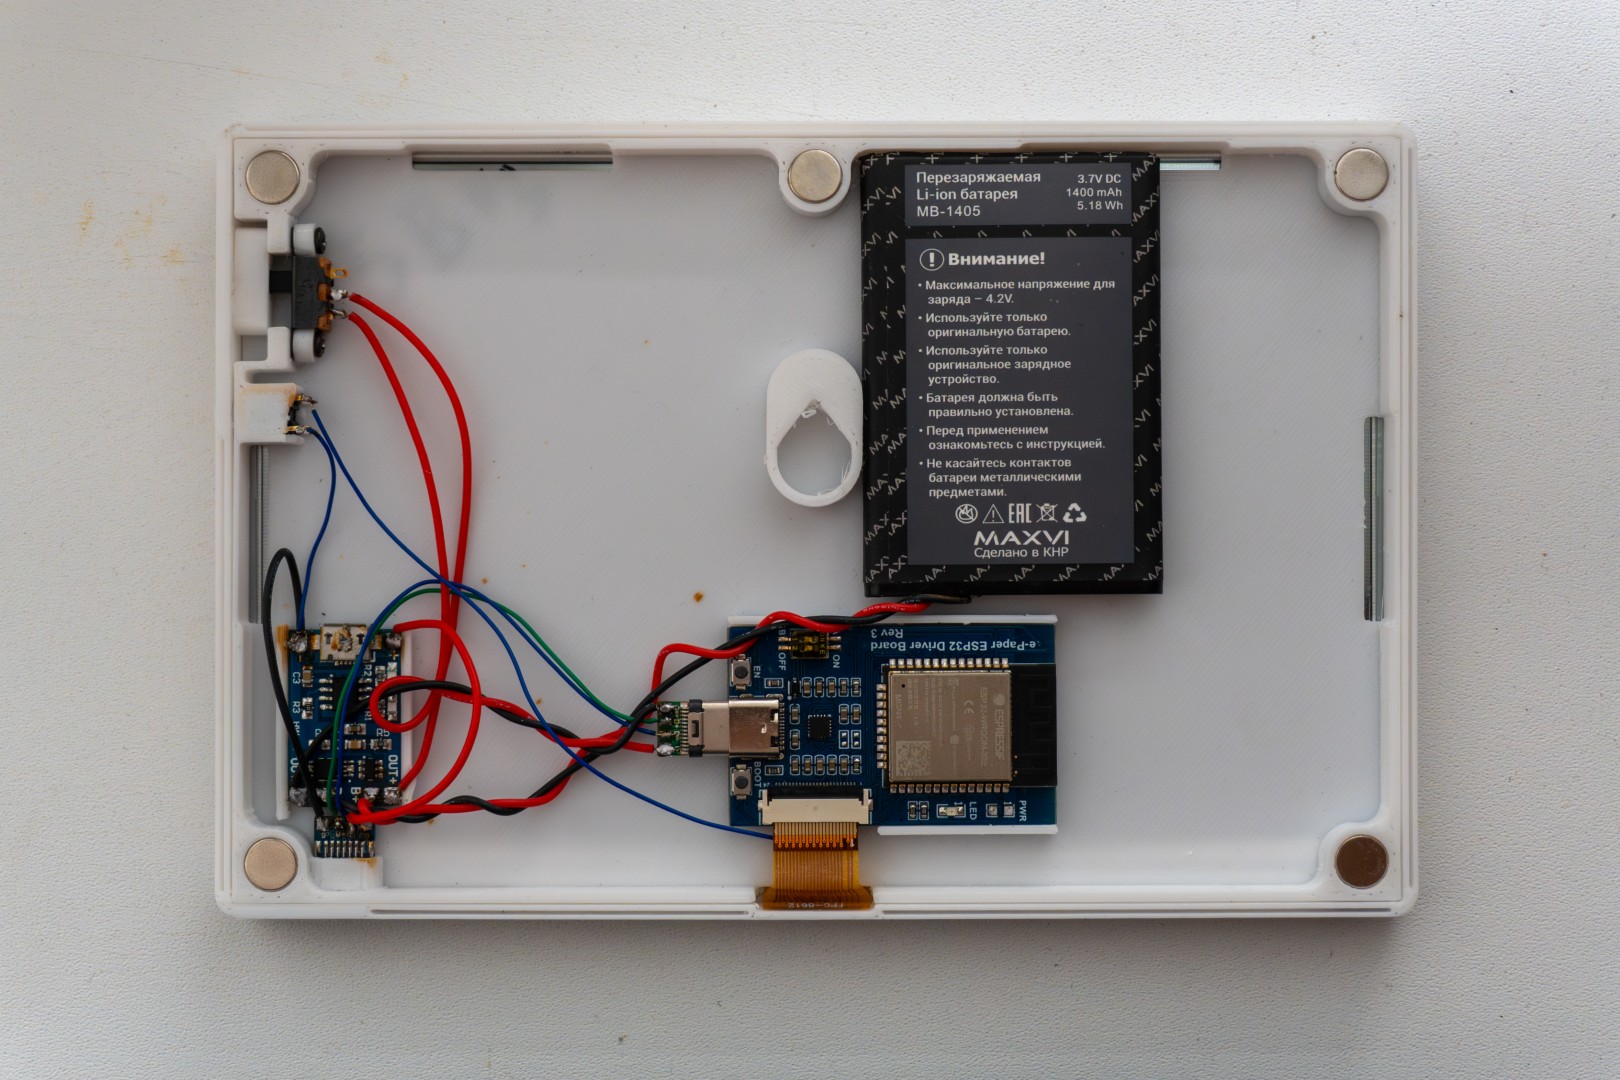
Waveshare E-Paper ESP32 Driver Board (V3) | Aliexpress | 1 | |
| — | Li-ion Battery | — | 1 | Max thickness 7.4 mm. Updating once per hour, a 1400 mAh (5.18 Wh) battery lasts about a month. |
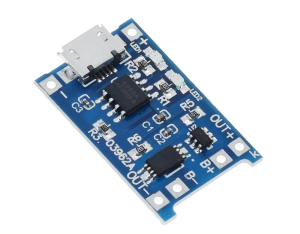 |
TP4056 charging module | Aliexpress | 1 | |
| — | 100 kOhm Resistor | — | 2 | |
 |
8x3mm Neodymium magnet | — | 5 | 5 magnets securely hold the 150g display on a metal door. |
| — | T-7000/B-7000 Glue | — | 1 |
Estimated cost per screen (including 20% VAT and shipping): ~$50.
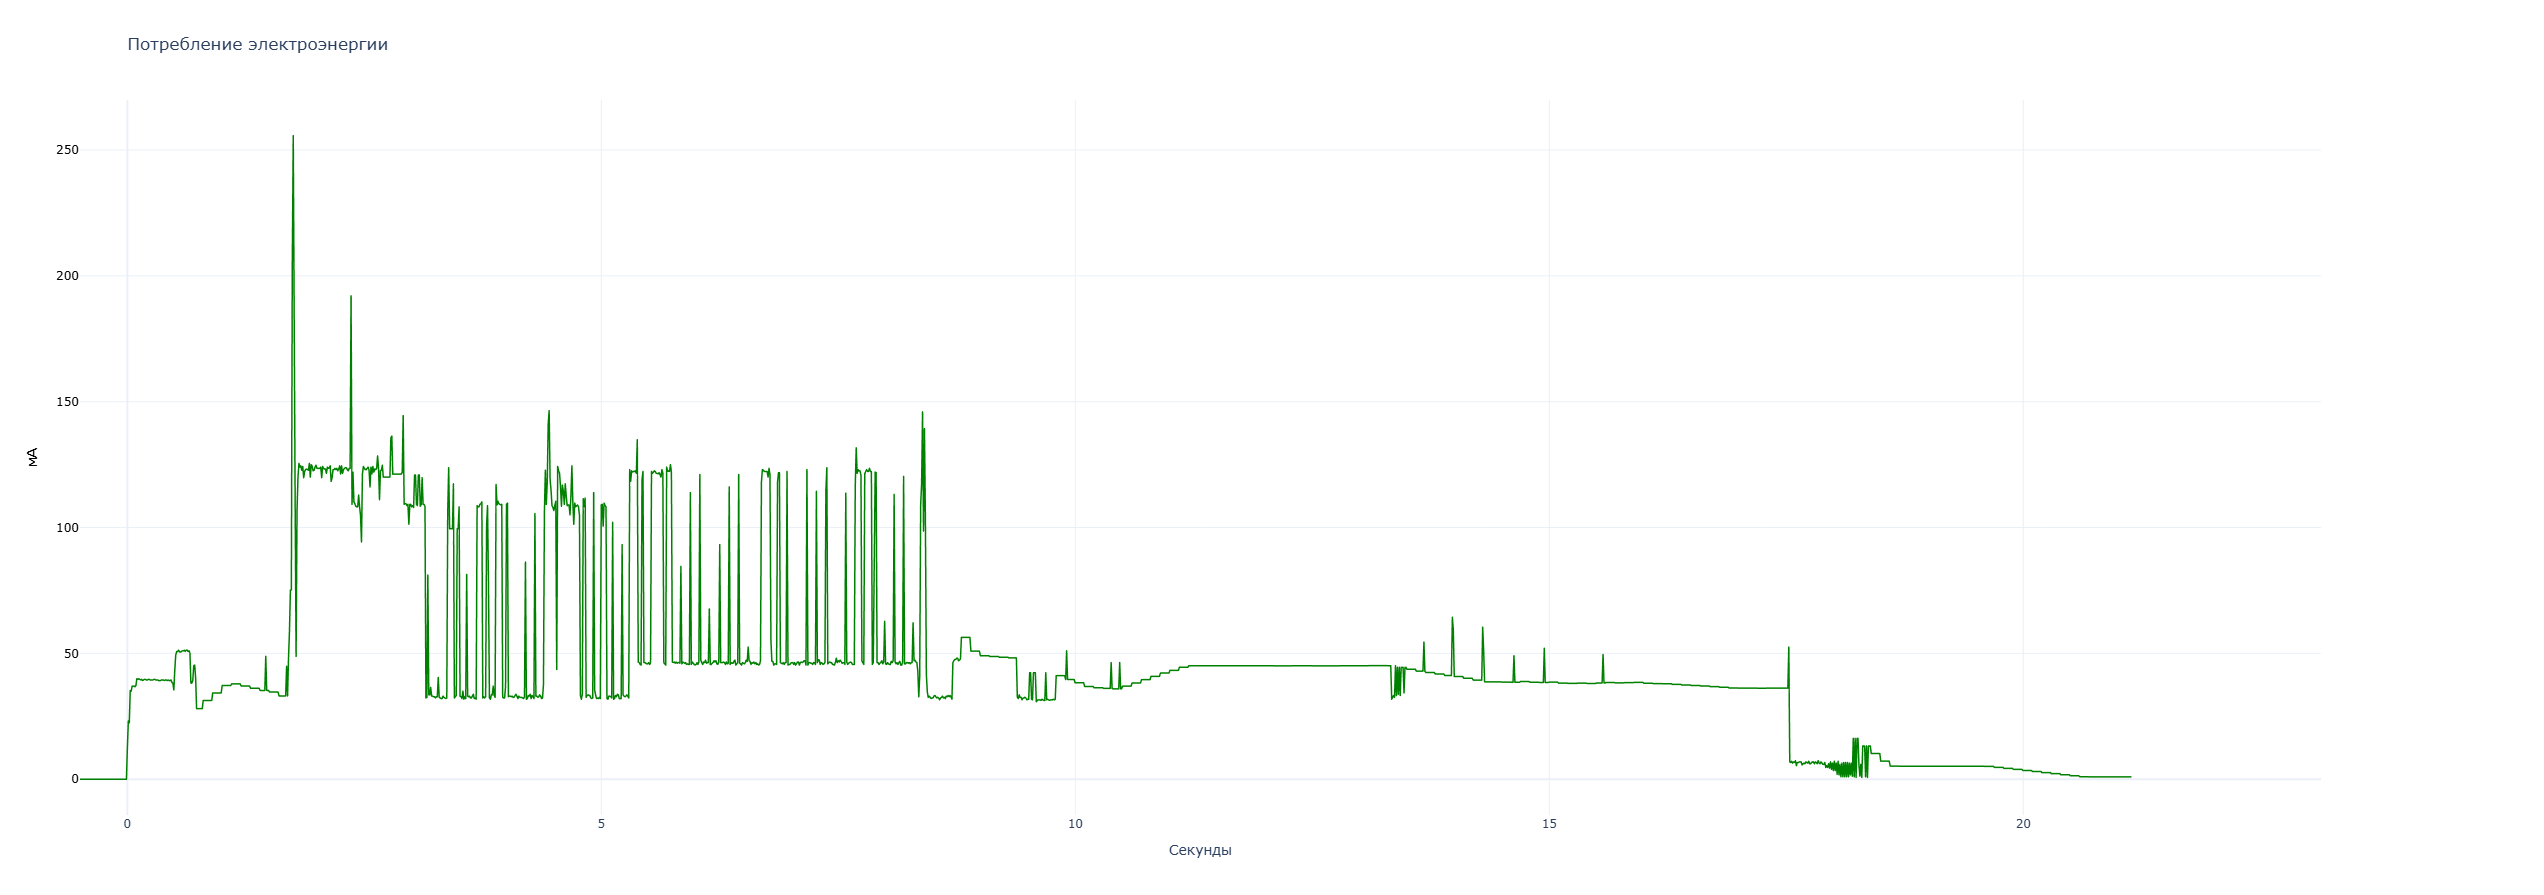
Power Consumption
Assembly
- Remove the red PWR LED from the "Waveshare E-Paper ESP32 Driver Board" to save energy.
-
To make the ESP32 driver board thinner, desolder the pins on its bottom side. (Tip: lift and remove the plastic spacer between pins with a screwdriver first).
-
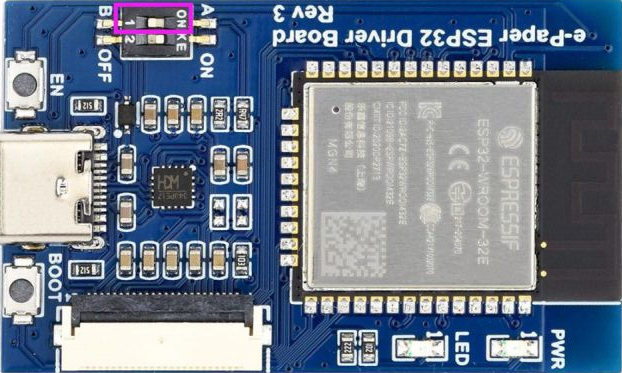
Set switch #1 on the ESP32 to position A.
-
Set switch #2 on the ESP32 to the "ON" position. This switch controls power to the UART module via USB. When the module is not in use, you can manually turn it off to save energy (note: if switch 2 is "OFF", firmware cannot be uploaded).
-
Assemble all housing parts in the specified order.
-
Solder the components according to the diagram.

Project Link -
Apply T-7000/B-7000 glue around the magnets to prevent the case from sliding on smooth metal surfaces.

Firmware Installation
You can use the button below to install the pre-compiled firmware onto the "Waveshare E-Paper ESP32 Driver Board (V3)" via USB directly from your browser, or download the configuration file and install the firmware via the ESPHome Device Builder.
- Connect the ESP to a USB port. You may need to press and hold the "boot" button while simultaneously pressing the "reset" button.
- Click "Connect" and select the correct COM port.
- Wait about 2 minutes for the firmware to install.
- After installation, you can configure the Wi-Fi.
Changing the URLs for "HA" and "Inker"
The default URLs for "HA" ( http://homeassistant.local:8123 ) and "Inker" ( http://homeassistant.local:8124 ) can be changed in the ESP32 web interface (default login and password for the web interface is "esphome-trmnl"). Press the button to wake up the board, wait one second, then hold the button for 5 seconds to enter setup mode. If the board is connected to Wi-Fi, it will display a QR code with a link to the web interface; if not connected, it will show a QR code with a link to the captive portal.
-
Install "ESPHome Device Builder"

-
Download the configuration file esphome-trmnl.yaml and change the "substitutions" values to your own.
-
Add the following to your ESPHome "secrets.yaml":
wifi_ssid: "Your_wifi_network_name" wifi_password: "Your_wifi_network_password" trmnl_wifi_ap_password: "Password_for_display_access_point" trmnl_web_username: "Username_for_display_web_interface_access" trmnl_web_password: "Password_for_display_web_interface_access" trmnl_ota_password: "Password_for_OTA_updates" - Upload the edited yaml to "ESPHome" and install the firmware on the ESP32.
Installing Inker
You can install the official "Inker" via Docker and change the "Inker" server URL in the ESP32 web interface, or install my fork directly into HA and change nothing.
Important Note
This guide assumes you already have Home Assistant installed. You will also need Docker with the Docker Compose plugin. Instructions are based on Debian OS.
-
Create a directory
Create a directory (e.g., ./inker) to store the docker-compose.yml file and enter it.mkdir ./inker cd ./inker -
Create "docker-compose.yml" by running the following commands:
Create docker-compose.ymlcat <<EOF > docker-compose.yml services: inker: image: wojooo/inker:latest container_name: inker restart: unless-stopped ports: - "80:80" volumes: - postgres_data:/var/lib/postgresql/17/main - redis_data:/data - uploads_data:/app/uploads environment: TZ: UTC ADMIN_PIN: "1111" volumes: postgres_data: redis_data: uploads_data: EOF -
Start the container
Run the following command in the directory you created in step 1 (which should now contain your custom "docker-compose.yml" file) to run "Inker" as a background service:
docker compose up -d
Updating "Inker"
When a new version is released, review the release notes for any breaking changes. After that, you can update and restart the application by running the following commands in the directory where your docker-compose.yml file is located:
docker compose pull && docker compose up -d
docker image prune
- Install the application in "HA"
Security
It is highly recommended to keep "Inker" accessible exclusively within your local network and not to forward ports to the outside world. If remote access is absolutely necessary, use only trusted and secure channels.
Home Assistant Configuration
-
Install the "ESPHome-TRMNL" integration
This method allows you to receive updates directly on the HACS main page. If HACS isn't already installed, download it by following the instructions on the hacs.xyz/docs/setup/download/ page.
- In HACS, go to the menu in the upper right corner, then select "Custom Repositories."
- Then add the repository https://github.com/kfattum/esphome-trmnl and select "Integration." After that, click "Add."
- After adding, click the "Cancel" button next to the "Add" button.
- Download the integration by clicking
 or search for ESPHome-TRMNL.
 - Restart Home Assistant for the system to recognize the new files.
- Add the integration to HA by clicking
 or go to Settings -> Devices & Services -> Add Integration, search for "ESPHome-TRMNL" -> Add
 - When you turn on the screen, it should automatically appear in the "ESPHome-TRMNL" integration.
This method requires manually copying files and monitoring updates yourself.
- Download the archive esphome_trmnl_custom_integration.zip
- Unzip the downloaded archive on your computer.
- Find the "custom_components/esphome_trmnl" folder inside and copy the "esphome_trmnl" folder to the "custom_components" directory of your Home Assistant configuration.
- Restart Home Assistant for the system to recognize the new files.
- Go to Settings -> Devices & Services -> Add Integration, search for "ESPHome-TRMNL" -> Add
- When you turn on your screen, it should automatically appear in the "ESPHome-TRMNL" integration.
-
Install Blueprint
 and set up the automation following the built-in prompts.
Button Control
- Holding the button in deep sleep mode resets the forcefully set screen, refresh interval, and display update lock in the "Home Assistant" integration.
- A long press (more than 5 seconds) in active mode turns on the setup mode. In this mode, if the board is connected to Wi-Fi, it will display a QR code with a link to the web interface (default login and password for the web interface is "esphome-trmnl"); if not connected, it will show a QR code linking to the captive portal. In this mode, the device stays awake for 30 minutes and then goes into deep sleep.
- A short press wakes up/reboots the device.
Battery Voltage Sensor Calibration (ADC Calibration)
- Record readings at battery voltages of 4.20, 4.19, 3.75, and 3.60 V.
- Enter the data into the filter. To the left of (->) is the sensor value, and to the right is the true value:
    sensor:
  - platform: adc
    ...
    id: battery_voltage
    ...
       - calibrate_linear:
           - 3.22 -> 3.75
           - 3.64 -> 4.19
           - 3.89 -> 4.20
    ...
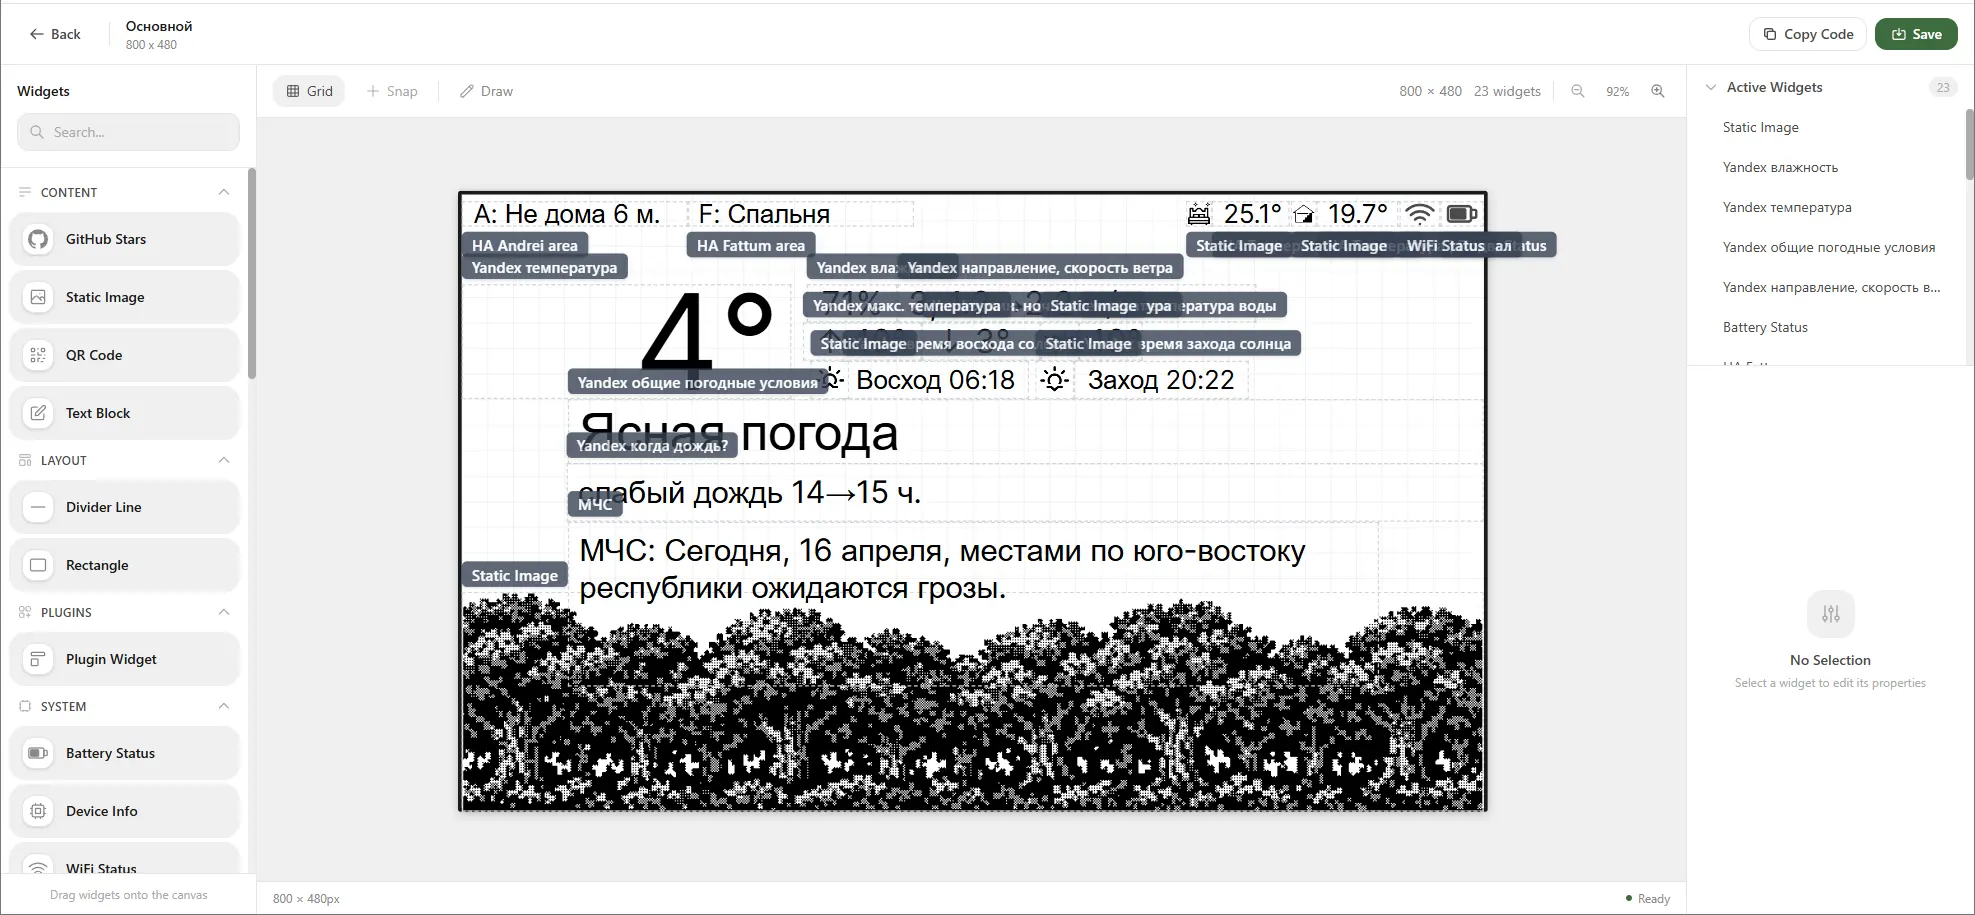
Widgets
Creating Custom Widgets
Example 1. Home Assistant "Time and Date"
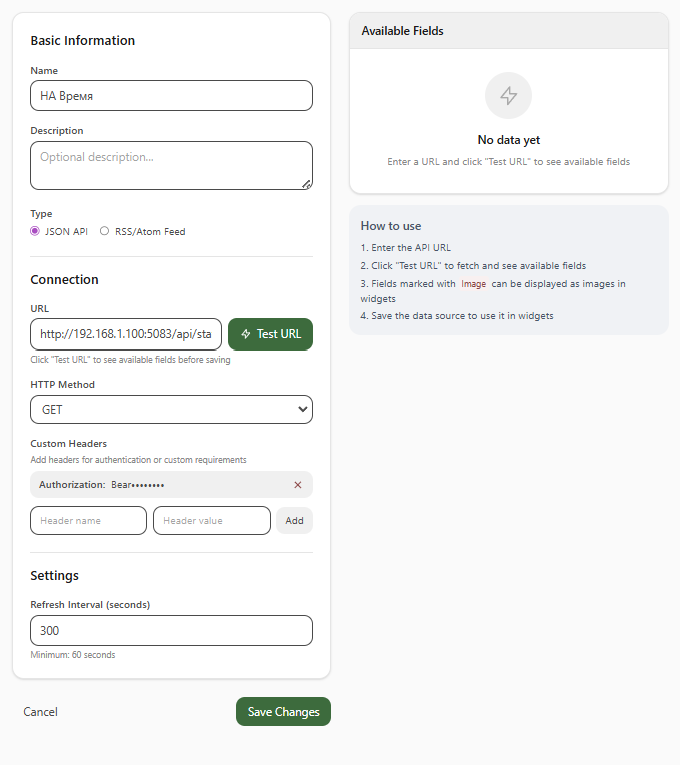
Phase 1. Data Source Setup. Here we tell Inker where and how to get data from "Home Assistant".
- Create a "New Data Source" in the "Inker" interface.
-
In the "Basic Information" section:
- "Name": Enter a clear name, e.g., "HA Time".
- "Type": Select "JSON API".
-
In the "Connection" section:
-
"URL": Provide the API address of your "Home Assistant" for the specific sensor.
- Format:
http://<HA-IP-Address>:<port>/api/states/<sensor_name>
- Format:
-
"HTTP Method": Select "GET".
-
"Custom Headers": Be sure to add an authorization header for "Home Assistant" (you will need a long-lived access token created in the profile of a non-privileged HA user for this).
- "Header name": enter
Authorization - "Header value": enter "Bearer YOUR_TOKEN" (replace "YOUR_TOKEN" with your actual token from HA, note the space after the word Bearer).
Security
It is strongly recommended NOT to create a long-lived access token from an administrator account in "Home Assistant".
- Click the "Add" button.
- "Header name": enter
-
-
Click the green "Test URL" button. If everything is configured correctly, Inker will connect to Home Assistant and available fields (e.g., "entity_id", "state", "last_changed", etc.) will appear in the right panel.
-
In the "Settings" section:
- "Refresh Interval" (seconds): Set the desired data update interval in seconds.
-
Click "Save Changes".
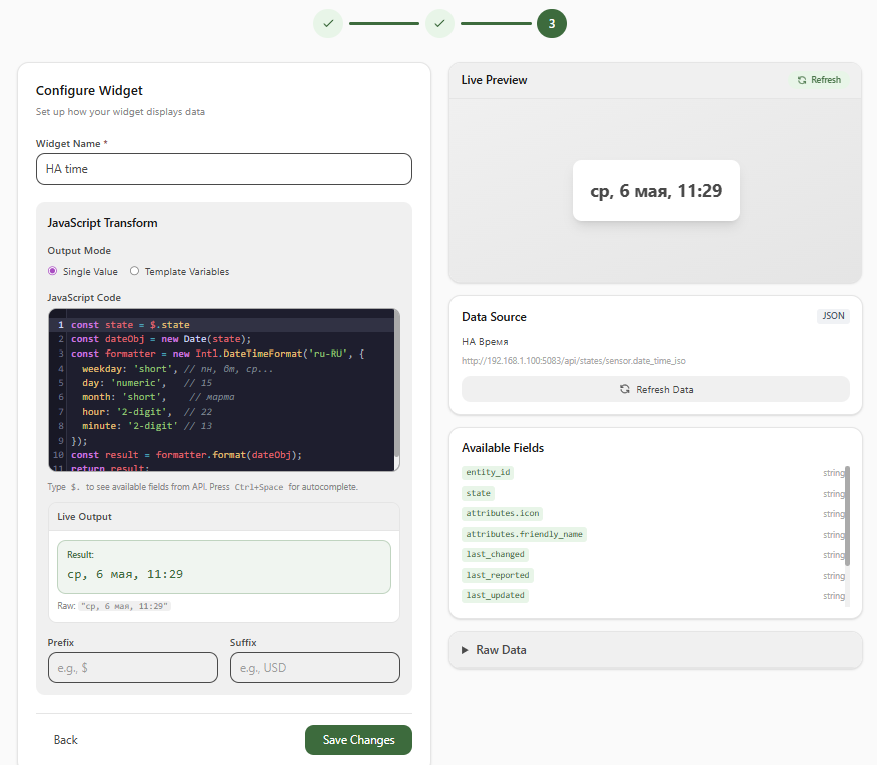
Phase 2. Widget Setup. Here we configure exactly how the received data will be displayed on the screen.
- Create a new Custom Widget in the Inker interface.
- Select the "Data Source" we created in the first phase (e.g., "HA Time").
- Choose Display Type: JavaScript
- In the "Widget Name" field, enter a name for the widget, e.g., "HA time".
-
In the "JavaScript Transform" section, we configure the formatting of the received data:
- "Output Mode": Select Single Value.
- In the "JavaScript Code" field, paste the following code to transform the date and time:
const state = $.state; const dateObj = new Date(state); const formatter = new Intl.DateTimeFormat('en-US', { weekday: 'short', // Mon, Tue... day: 'numeric', // 15 month: 'short', // Mar hour: '2-digit', // 22 minute: '2-digit' // 13 }); const result = formatter.format(dateObj); return result; -
In the "Live Output" block below, you will immediately see the result of your code. If data is arriving correctly from HA, the formatted time will be displayed there (e.g.:
Tue, May 5, 11:45). You will also see a preview of the finished widget in the "Live Preview" panel at the top right. - Click "Save Changes" to finish setting up the widget.
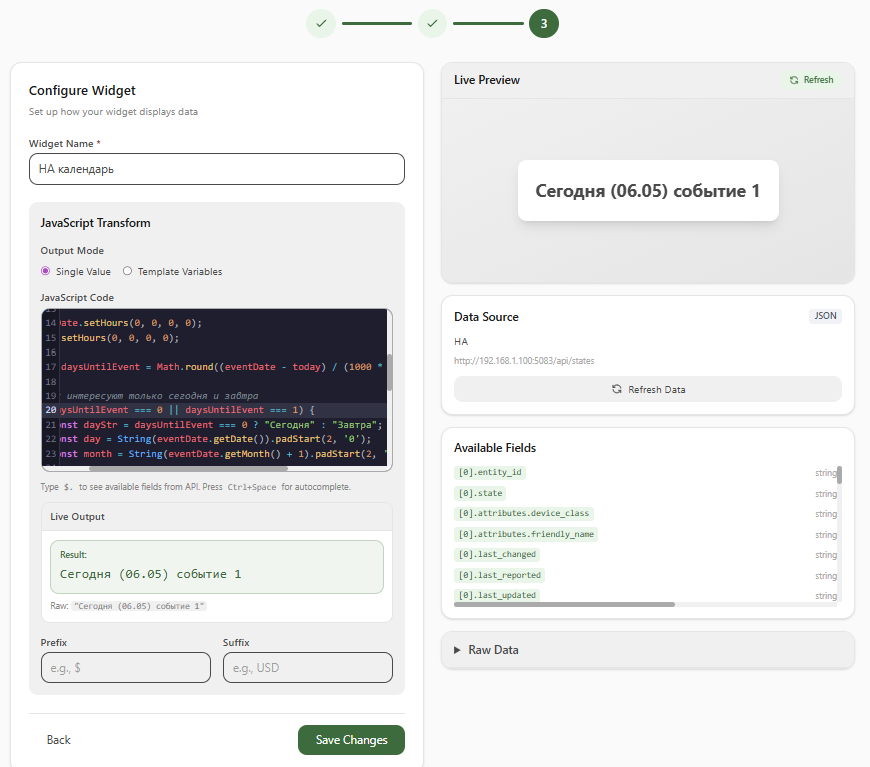
Example 2. Home Assistant "Calendar"
This widget collects events from multiple HA calendars and displays them as a single line.
Configured similarly to Example 1, but with a different URL that returns the state of all entities:
http://<HA_IP_ADDRESS>:<PORT>/api/states
const entities = ["calendar.test1", "calendar.test2"];
const groupedEvents = {}; // Object for grouping: { "Today (05.05)": ["Event 1", "Event 2"] }

entities.forEach(entityId => {
    const calendar = $.find(item => item.entity_id === entityId);

    if (calendar && calendar.attributes && calendar.attributes.start_time) {
        const eventName = calendar.attributes.message;
        const startTime = calendar.attributes.start_time;

        const eventDate = new Date(startTime.replace(' ', 'T'));
        const today = new Date();

        eventDate.setHours(0, 0, 0, 0);
        today.setHours(0, 0, 0, 0);

        const daysUntilEvent = Math.round((eventDate - today) / (1000 * 60 * 60 * 24));

        if (daysUntilEvent === 0 || daysUntilEvent === 1) {
            const dayStr = daysUntilEvent === 0 ? "Today" : "Tomorrow";
            const day = String(eventDate.getDate()).padStart(2, '0');
            const month = String(eventDate.getMonth() + 1).padStart(2, '0');

            const label = `${dayStr} (${day}.${month})`;

            // If this date isn't in the object yet, create an empty array
            if (!groupedEvents[label]) {
                groupedEvents[label] = [];
            }
            // Add the event name to the array for this date
            groupedEvents[label].push(eventName);
        }
    }
});

// Form the final output strings
const result = Object.keys(groupedEvents).map(label => {
    const events = groupedEvents[label].join(", "); // Combine events with a comma
    return `${label} ${events}`;
});

// Return the result separated by a newline (or comma)
return result.join("  |  ");
- In the "Live Output" block below, you will immediately see the result of your code. If data is received correctly from HA, it will display calendar data for the current or next day (for example:
"Today (05.05)": ["Event 1", "Event 2"]).
Importing Widgets
Widgets are imported by simply inserting the "screen code" on the "screens" page.
Automation Example
This example demonstrates how to dynamically manage an E-Ink display throughout the day: switching the displayed content in the evening and putting the device into deep power-saving mode at night.
Automation Scenario
- Evening (20:00): A command to change the image ("inker" screen) is sent to the display via the
textentity. An evening template is displayed on the screen (e.g., a cozy dashboard or clock). -
Midnight (00:00): The display switches to night mode to save battery:
-
The update interval (
number) is increased to17800seconds (~5 hours). - The update lock mode (
switch) is turned on, putting the device to sleep. -
The URL is cleared. Now, when the screen wakes up, the "inker" playlist will be displayed.
-
Morning (05:30): The display wakes up:
-
Sleep time is reset to
0(return to the standard polling interval). - The update lock is turned off, and the display updates the data on the screen again.
Automation Code (YAML)
You can copy this code into the text mode of the Home Assistant automation editor:
alias: "ESPHome-TRMNL: Screen management throughout the day"
description: "Automatic screen switching and deep sleep at night"
triggers:
  - trigger: time
    at: "20:00:00"
    id: evening
  - trigger: time
    at: "00:00:00"
    id: midnight
  - trigger: time
    at: "05:30:00"
    id: morning
conditions: []
actions:
  - choose:
      # EVENING MODE
      - conditions:
          - condition: trigger
            id:
              - evening
        sequence:
          - action: text.set_value
            target:
              device_id: ad5052c25da850ff28860ef907f3367e
            data:
              value: http://192.168.1.100:8124/api/device-images/design/2
            note: "Setting the evening screen layout"

      # NIGHT MODE (POWER SAVING)
      - conditions:
          - condition: trigger
            id:
              - midnight
        sequence:
          - action: number.set_value
            target:
              area_id: prikhozhaia
            data:
              value: "17800"
            note: "Increasing sleep interval until morning"
          - action: switch.turn_on
            target:
              area_id: prikhozhaia
            note: "Turning on update lock (deep sleep)"
          - action: text.set_value
            target:
              device_id: ad5052c25da850ff28860ef907f3367e
            data: {}
            note: "Resetting custom URL"

      # MORNING WAKE UP
      - conditions:
          - condition: trigger
            id:
              - morning
        sequence:
          - action: number.set_value
            target:
              area_id: prikhozhaia
            data:
              value: "0"
            note: "Resetting sleep interval to standard"
          - action: switch.turn_off
            target:
              area_id: prikhozhaia
            note: "Turning off lock, starting updates"
mode: single
FAQ
- How to change Wi-Fi SSID and password? Connect via USB open web.esphome.io CONNECT () Configure Wi-Fi (ESP32 must be in active mode).
Help! Something is not working.
- Incorrect display: if image quality is low or the device does not work, try toggling switch #1 on the ESP32.
- Nothing works -> open web.esphome.io, connect the panel via USB, and check the logs.
- ESPHome hasn't updated but stopped building working firmware: delete the
C:\Users\<user_name>\.platformio\and\.esphome\buildfolders.
Comments